Prenda grátis


Mais de 200 000 artigos
e ofertas de topo
e ofertas de topo
Transporte mundial,
custo-benefício
custo-benefício
Direito de devolução de 100 dias
ereembolso do dinheiro
ereembolso do dinheiro
Excelente
serviço ao cliente
serviço ao cliente
Prendas gratuitas
de 75 euros
de 75 euros
Tradução automática
Texto original in English
Icon Airflite, Pinlock lente ProtecTint
N.º art.: 11056144
ProtecTint® - de claro a luz fumaça em questão de segundos. A lente de inserção Pinlock ProtecTINT reagem à luz UV por sua cor de tonalidade de escurecimento automaticamente, mantendo seu capacete protetor de cara névoa-livres, ao mesmo tempo.
The Pinlock® viseira inserção é feita de um material que contém propriedades de absorção da umidade que reage como uma esponja e absorve umidade eficazmente. A parte interna da Pinlock® é forrada com um cordão de silicone, que cria um tipo de janela envidraçada duplo efeito quando a inserção de viseira Pinlock® é anexada a viseira do capacete. O bolso de ar que está preso entre as viseiras actua como um isolador para o interior as temperaturas do capacete da motocicleta. Propriedades de absorção eficiente combinado com o duplo vidros como característica, a inserção de viseira de Pinlock® é o mais eficaz, durável e acessível solução de anti-fog no mercado.
Como instalar
Etapa 1
O Pinlock® FliteShield™ inserir lente só funciona com Pinlock® pronto FliteShields™ (vendido separadamente) disponível em Clear, fumo escuro, luz fumaça e prata RST.
Passo 2
Remova o capacete, o escudo do capacete. Flexione o escudo do capacete e colocar a lente de Pinlock® entre os dois pinos fornecida no escudo capacete. Uma vez instalado, remova a película protetora.
Etapa 3
Inspecione o selo de silício na lente Pinlock®. Deve fazer contato com o escudo do capacete a fim de evitar qualquer condensação formando entre o escudo do capacete e a lente Pinlock®. Se correto, re-instale o seu escudo de capacete.
Etapa 4
Se o selo de silicone não faz completo contato com o escudo do capacete você pode ajustar a pressão, girando o contador fora do parafuso no sentido horário, usando a seta fora o pino para referência. Uma vez terminado, re-instale o seu escudo.
Icon Airflite, Pinlock lens ProtecTint
Article No.: 11056144
ProtecTint® - From clear to light smoke in a matter of seconds.The Pinlock ProtecTINT insert lens react to UV light by darkening its tint color automatically while keeping your helmet face shield fog-free at the same time.
The Pinlock® visor insert is made out of a material that contains moisture absorbing properties, which reacts like a sponge and absorbs moisture effectively.The inner part of the Pinlock® is lined with a silicon bead, which creates a double glazed window type of effect when the Pinlock® visor insert is attached to the helmet visor. The pocket of air that is trapped in between the visors acts as an insulator for the inside temperatures in the motorcycle helmet. Efficient absorption properties combined with the double glazed like feature, the Pinlock® visor insert is the most effective, durable and affordable anti-fog solution on the market.
How to install
Step 1
The Pinlock® FliteShield™ Insert Lens only works with Pinlock® Ready FliteShields™ (Sold Separately) available in Clear, Dark Smoke, Light Smoke, and RST Silver.
Step 2
Remove the helmet shield from the helmet. Flex the helmet shield and place the Pinlock® lens between the two pins provided in the helmet shield. Once installed, remove protective film.
Step 3
Inspect the silicon seal on the Pinlock® lens. It must make full contact with the helmet shield in order to avoid any condensation forming between the helmet shield and the Pinlock® lens. If correct, re-install your helmet shield.
Step 4
If the silicon seal does not make full contact with the helmet shield you can adjust the pressure by turning the outside screw counter clockwise using the outside arrow in the pin for reference. Once finished, re-install your shield.
Here you find some information about Pinlock Anti-Fog lenses
Acessórios adequados
Produtos semelhantes
|
|
Icon ForceShield, viseira espelhada | a partir de $ 52.15 |
|
|
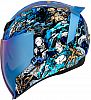
Icon Airflite Mips Jewel, capacete integral SALE PVP $ 342.1548% de desconto$ 179.23 | PVP $ 342.1548% de desconto$ 179.23 |

|
Icon Airflite Mips ReDoodle, capacete integral SALE PVP $ 342.1540% de desconto$ 206.24 | PVP $ 342.1540% de desconto$ 206.24 |
|
|
Icon Airflite Blockchain, capacete integral SALE PVP $ 333.1438% de desconto$ 206.24 | PVP $ 333.1438% de desconto$ 206.24 |
|
|
Icon Airflite Crosslink, capacete integral SALE PVP $ 324.1436% de desconto$ 206.24 | PVP $ 324.1436% de desconto$ 206.24 |